
Copyright 1998,1999 The OpenLDAP Foundation, Redwood City, California, USA All rights reserved.
Redistribution and use in source and binary forms are permitted only as authorized by the OpenLDAP Public License. A copy of this license is available at http://www.OpenLDAP.org/license.html or in file LICENSE in the top-level directory of the distribution.
This work is derived from the University of Michigan LDAP v3.3 distribution. Information concerning is available at http://www.umich.edu/~dirsvcs/ldap/ldap.html.
This work also contains materials derived from public sources.
Additional Information about OpenLDAP can be obtained at: http://www.openldap.org/
or by sending e-mail to: info@OpenLDAP.org
Portions Copyright (c) 1992-1996 Regents of the University of Michigan. All rights reserved.
Redistribution and use in source and binary forms are permitted provided that this notice is preserved and that due credit is given to the University of Michigan at Ann Arbor. The name of the University may not be used to endorse or promote products derived from this software without specific prior written permission. This software is provided ``as is'' without express or implied warranty.
This document describes how to build, configure, and run the stand-alone LDAP daemon (slapd) and the stand-alone LDAP update replication daemon (slurpd). It is intended for newcomers and experienced administrators alike. This section provides a basic introduction to directory service, and the directory service provided by slapd in particular.
A directory is like a database, but tends to contain more descriptive, attribute-based information. The information in a directory is generally read much more often than it is written. As a consequence, directories don't usually implement the complicated transaction or roll-back schemes regular databases use for doing high-volume complex updates. Directory updates are typically simple all-or-nothing changes, if they are allowed at all. Directories are tuned to give quick-response to high-volume lookup or search operations. They may have the ability to replicate information widely in order to increase availability and reliability, while reducing response time. When directory information is replicated, temporary inconsistencies between the replicas may be OK, as long as they get in sync eventually.
There are many different ways to provide a directory service. Different methods allow different kinds of information to be stored in the directory, place different requirements on how that information can be referenced, queried and updated, how it is protected from unauthorized access, etc. Some directory services are local, providing service to a restricted context (e.g., the finger service on a single machine). Other services are global, providing service to a much broader context (e.g., the entire Internet). Global services are usually distributed, meaning that the data they contain is spread across many machines, all of which cooperate to provide the directory service. Typically a global service defines a uniform namespace which gives the same view of the data no matter where you are in relation to the data itself.
Slapd's model for directory service is based on a global directory model called LDAP, which stands for the Lightweight Directory Access Protocol. LDAP is a directory service protocol that runs over TCP/IP. The nitty-gritty details of LDAP are defined in RFC 1777 "The Lightweight Directory Access Protocol." This section gives an overview of LDAP from a user's perspective.
What kind of information can be stored in the directory? The LDAP directory service model is based on entries. An entry is a collection of attributes that has a name, called a distinguished name (DN). The DN is used to refer to the entry unambiguously. Each of the entry's attributes has a type and one or more values. The types are typically mnemonic strings, like "cn" for common name, or "mail" for email address. The values depend on what type of attribute it is. For example, a mail attribute might contain the value "babs@umich.edu". A jpegPhoto attribute would contain a photograph in binary JPEG/JFIF format.
How is the information arranged? In LDAP, directory entries are arranged in a hierarchical tree-like structure that reflects political, geographic and/or organizational boundaries. Entries representing countries appear at the top of the tree. Below them are entries representing states or national organizations. Below them might be entries representing people, organizational units, printers, documents, or just about anything else you can think of. Figure 1 shows an example LDAP directory tree, which should help make things clear.
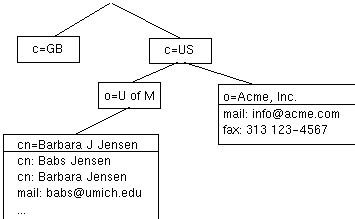
Figure 1: An example LDAP directory tree.
In addition, LDAP allows you to control which attributes are required and allowed in an entry through the use of a special attribute called objectclass. The values of the objectclass attribute determine the schema rules the entry must obey.
How is the information referenced? An entry is referenced by its distinguished name, which is constructed by taking the name of the entry itself (called the relative distinguished name, or RDN) and concatenating the names of its ancestor entries. For example, the entry for Barbara Jensen in the example above has an RDN of "cn=Barbara J Jensen" and a DN of "cn=Barbara J Jensen, o=U of M, c=US". The full DN format is described in RFC 1779, "A String Representation of Distinguished Names."
How is the information accessed? LDAP defines operations for interrogating and updating the directory. Operations are provided for adding and deleting an entry from the directory, changing an existing entry, and changing the name of an entry. Most of the time, though, LDAP is used to search for information in the directory. The LDAP search operation allows some portion of the directory to be searched for entries that match some criteria specified by a search filter. Information can be requested from each entry that matches the criteria.
For example, you might want to search the entire directory subtree below the University of Michigan for people with the name Barbara Jensen, retrieving the email address of each entry found. LDAP lets you do this easily. Or you might want to search the entries directly below the c=US entry for organizations with the string "Acme" in their name, and that have a fax number. LDAP lets you do this too. The next section describes in more detail what you can do with LDAP and how it might be useful to you.
How is the information protected from unauthorized access? Some directory services provide no protection, allowing anyone to see the information. LDAP provides a method for a client to authenticate, or prove its identity to a directory server, paving the way for rich access control to protect the information the server contains.
LDAP directory service is based on a client-server model. One or more LDAP servers contain the data making up the LDAP directory tree. An LDAP client connects to an LDAP server and asks it a question. The server responds with the answer, or with a pointer to where the client can get more information (typically, another LDAP server). No matter which LDAP server a client connects to, it sees the same view of the directory; a name presented to one LDAP server references the same entry it would at another LDAP server. This is an important feature of a global directory service, like LDAP.
Slapd is an LDAP directory server that runs on many different UNIX platforms. You can use it to provide a directory service of your very own. Your directory can contain pretty much anything you want to put in it. You can connect it to the global LDAP directory service, or run a service all by yourself. Some of slapd's more interesting features and capabilities include:
Choice of databases: Slapd comes with three different backend databases you can choose from. They are LDBM, a high-performance disk-based database; SHELL, a database interface to arbitrary UNIX commands or shell scripts; and PASSWD, a simple password file database.
Multiple database instances: Slapd can be configured to serve multiple databases at the same time. This means that a single slapd server can respond to requests for many logically different portions of the LDAP tree, using the same or different backend databases.
Generic database API: If you require even more customization, slapd lets you write your own backend database easily. Slapd consists of two distinct parts: a front end that handles protocol communication with LDAP clients; and a backend that handles database operations. Because these two pieces communicate via a well-defined C API, you can write your own customized database backend to slapd.
Access control: Slapd provides a rich and powerful access control facility, allowing you to control access to the information in your database(s). You can control access to entries based on LDAP authentication information, IP address, domain name and other criteria.
Threads: Slapd is threaded for high performance. A single multi-threaded slapd process handles all incoming requests, reducing the amount of system overhead required. Slapd will automatically select the best thread support for your platform.
Replication: Slapd can be configured to maintain replica copies of its database. This master/slave replication scheme is vital in high-volume environments where a single slapd just doesn't provide the necessary availability or reliability.
Configuration: Slapd is highly configurable through a single configuration file which allows you to change just about everything you'd ever want to change. Configuration options have reasonable defaults, making your job much easier.
Slapd also has its limitations, of course. It does not currently handle aliases, which are part of the LDAP model. The main LDBM database backend does not handle range queries or negation queries very well. These features and more will be coming in a future release.
LDAP was originally developed as a front end to X.500, the OSI directory service. X.500 defines the Directory Access Protocol (DAP) for clients to use when contacting directory servers. DAP is a heavyweight protocol that runs over a full OSI stack and requires a significant amount of computing resources to run. LDAP runs directly over TCP and provides most of the functionality of DAP at a much lower cost.
This use of LDAP makes it easy to access the X.500 directory, but still requires a full X.500 service to make data available to the many LDAP clients being developed. As with full X.500 DAP clients, a full X.500 server is no small piece of software to run.
The stand-alone LDAP daemon, or slapd, is meant to remove much of the burden from the server side just as LDAP itself removed much of the burden from clients. If you are already running an X.500 service and you want to continue to do so, you can probably stop reading this guide, which is all about running LDAP via slapd, without running X.500. If you are not running X.500, want to stop running X.500, or have no immediate plans to run X.500, read on.
It is possible to replicate data from a slapd directory server to an X.500 DSA, which allows your organization to make your data available as part of the global X.500 directory service on a "read-only" basis. This is discussed in section 11.6.
Another way to make data in a slapd server available to the X.500 community would be by using a X.500 DAP to LDAP gateway. At this time, no such software has been written (to the best of our knowledge), but hopefully some group will see fit towrite such a gateway.
Slurpd is a UNIX daemon that helps slapd provide replicated service. It is responsible for distributing changes made to the master slapd database out to the various slapd replicas. It frees slapd from having to worry that some replicas might be down or unreachable when a change comes through; slurpd handles retrying failed requests automatically. Slapd and slurpd communicate through a simple text file that is used to log changes.
This section provides a quick step-by-step guide to building, installing and running slapd. It is intended to provide users with a simple and quick way to get started only. If you intend to run slapd seriously, you should read the rest of this guide.
The following sections provide more detailed information on making, installing, and running slapd.
This section gives a brief overview of various LDAP directory configurations, and how your LDAP server (either slapd or ldapd) fits in with the rest of the world.
In this configuration, you run a slapd which provides directory service for your local domain only. It does not interact with other directory servers in any way. This configuration is shown in Figure 2.
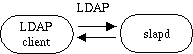
Figure 2: Local service via slapd configuration.
Use this configuration if you are just starting out (it's the one the quick-start guide makes for you) or if you want to provide a local service and are not interested in connecting to the rest of the world. It's easy to upgrade to another configuration later if you want.
In this configuration, you run a slapd which provides directory service for your local domain and an ldapd which provides access to the X.500 world (you don't have to run the ldapd yourself - you can just point to somebody else who does and doesn't mind you pointing to their service). This configuration is shown in Figure 3.
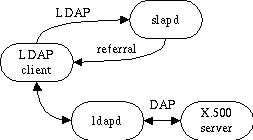
Figure 3: Local service via slapd + X.500 referrals configuration
Use this configuration if you want to provide local service but still want to be connected to the rest of the X.500 world. Remember, you don't necessarily have to be running the ldapd in this picture; you just need to find one you can point to.
In this configuration, you run an X.500 service which provides directory service for your local domain and gatewaying service to the rest of the X.500 world. LDAP clients gain access to the directory through an ldapd which runs at your site. This configuration is shown in Figure 4.

Figure 4: Local service via X.500 and ldapd configuration
Use this configuration if you are already running an X.500 service. Slapd is not involved in this configuration, so you can probably stop reading this guide.
The slurpd daemon is used to propagate changes from a master slapd to one or more slave slapds. An example master-slave configuration is shown in figure 5.

Figure 5: Master slapd with two slaves replicated with slurpd
This configuration can be used in conjunction with the first two configurations in situations where a single slapd does not provide the required reliability or availability.
Building and installing slapd requires three simple steps: configuring; making; and installing. The following sections describe each step in detail. If you are reading this guide, chances are you have already obtained the software, but just in case, here's where you can get the latest version of the OpenLDAP package, which includes all of the software discussed in this guide:
ftp://ftp.openldap.org/pub/OpenLDAP/openldap-release.tgz
There is also an OpenLDAP homepage accessible from the World Wide Web. This page contains the latest OpenLDAP news, release announcements, and pointers to other resources. You can access it at:
Before building slapd, be sure to take a look at the README file in the top level directory in the distribution so that you are familiar with the general configuration and make process.
Briefly, you should edit the include/ldapconfig.h.edit and Make-common files to contain the site-specific configuration your site requires before making. The next sections discuss these steps in more detail.
All of the general Make-common configuration variables (e.g., ETCDIR, BINDIR, etc.) apply to both slapd and slurpd. There are additional Make-common configuration variables that also affect how slapd and slurpd are built. They are:
This option controls whether slapd and slurpd get built at all. You should set it to yes, like this:
MAKE_SLAPD = yes
This option controls which slapd backend databases get built. You should set it to one or more of the following:
Example to enable the LDBM and SHELL backends only:
SLAPD_BACKENDS= -DLDAP_LDBM -DLDAP_SHELL
The default is to build all three backends. Note that building a backend only means that it can be enabled through the configuration file, not that it will automatically be enabled.
This option should only be defined if you have enabled the LDBM backend as described above. The LDBM backend relies on a low-level hash or B-tree package for its underlying database. This option selects which package it will use. The currently supported options in order of preference are:
Example to enable the Berkeley DB Btree backend:
LDBMBACKEND= -DLDBM_USE_DBBTREE
The default is -DLDBM_USE_NDBM, since it is the only one available on all UNIX systems. NDBM has some serious limitations, though (not thread-safe, severe size limits), and you are strongly encouraged to use one of the other packages if you can.
If you are using version 1.85 or earlier of the Berkeley db package, you will need to apply the patch found in build/db.1.85.patch to the db source before compiling it. You can do this with a command like this from the db source area:
patch -p < ldap-source-directory/build/db.1.85.patch
This option should only be defined if you have enabled the LDBM backend as described above, and the necessary library for the LDBMBACKEND option you chose above is not part of the standard C library (i.e., anything other than NDBM). This option specifies the library to link containing the package you selected, and optionally, its location.
Example to link with libdb.a, contained in /usr/local/lib:
LDBMLIB= -L/usr/local/lib -ldb
This option is normally set automatically in the Make-platform file, based on the platform on which you are building. You do not normally need to set it. If you want to use a non-default threads package, you can specify the appropriate -Ddefine to enable it here.
This option is normally set automatically in the Make-platform file, based on the platform on which you are building. You do not normally need to set it. If you have set THREADS to a non-default threads package as described above, you can specify the appropriate -Ldirectory flag and -llibname flag needed to link the package here.
This option controls the phonetic algorithm used by slapd when doing approximate searches. The default is to use the metaphone algorithm. You can have slapd use the soundex algorithm by setting this variable to -DSOUNDEX.
In addition to setting the LDAPHOST and DEFAULT_BASE defines near the top of this file, there are some slapd-specific defines near the bottom of the file you may want to change. The defaults should be just fine, unless you have special needs.
This define sets the location of the default slapd configuration file. Normally, it is set to $(ETCDIR)/slapd.conf, where ETCDIR comes from Make-common.
This define sets the default size limit on the number of entries returned from a search. This option is configurable via the tailor file, but if you want to change the default, do it here.
This define sets the default time limit for a search. This option is configurable via the tailor file, but if you want to change the default, do it here.
This define sets the location of the file to which slapd will write its process ID when it starts up.
This define sets the location of the file to which slapd will write its argument vector when it starts up.
This define sets the distinguished name used to retrieve monitoring information from slapd. See section 7 for more details.
This define is only relevant to the LDBM backend. It sets the minimum number of entry IDs that an index entry will contain before it becomes an allIDs entry. See Section 9.1 for more details.
Once you have edited the include/ldapconfig.h.edit file and the Make-common file (see the top level README file in the distribution), you are ready to make the software. From the top level LDAP source directory, type
make
You should examine the output of this command carefully to make sure everything is built correctly. Note that this command builds the LDAP libraries and associated clients as well as slapd and slurpd.
Note that the LDAP distribution can support making for multiple platforms from a single source tree. If you want to do this, consult the INSTALL file in the top level distribution directory.
Once the software has been properly configured and successfully made, you are ready to install it. You will need to have write permission to the installation directories you specified in the Make-common file. Typically, the installation is done as root. From the top level LDAP source directory, type
make install
You should examine the output of this command carefully to make sure everything is installed correctly. Slapd, slurpd, and their configuration files, slapd.conf, slapd.at.conf, and slapd.oc.conf will be installed in the ETCDIR directory you specified in the Make-common file.
This command will install the entire LDAP distribution. If you only want to install slapd and slurpd, you could do something like this:
 (cd servers/slapd; make install)
 (cd servers/slurpd; make install)
Once the software has been built and installed, you are ready to configure it for use at your site. All slapd runtime configuration is accomplished through the slapd.conf file, installed in the ETCDIR directory you specified in the Make-common file.
An alternate configuration file can be specified via a command-line option to slapd or slurpd (see Sections 5 and 8, respectively). This section describes the general format of the config file, followed by a detailed description of each config file option.
The slapd.conf file consists of a series of global configuration options that apply to slapd as a whole (including all backends), followed by zero or more database backend definitions that contain information specific to a backend instance.
Global options can be overridden in a backend (for options that appear more than once, the last appearance in the slapd.conf file is used). Blank lines and comment lines beginning with a `#' character are ignored. If a line begins with white space, it is considered a continuation of the previous line. The general format of slapd.conf is as follows:
 # comment - these options apply to every database
 <global config options>
 # first database definition & config options
 database <backend 1 type>
 <config options specific to backend 1>
 # second database definition & config options
 database <backend 2 type>
 <config options specific to backend 2>
 # subsequent database definitions & config options
 ...
Configuration line arguments are separated by white space. If an argument contains white space, the argument should be enclosed in double quotes "like this". If an argument contains a double quote or a backslash character `\', the character should be preceded by a backslash character `\'.
The distribution contains an example configuration file that will be installed in the ETCDIR directory. Also provided are slapd.at.conf, which contains many commonly used attribute definitions, and slapd.oc.conf, which contains many commonly used object class definitions. These files can be included from the slapd configuration file (see below).
This section separates the configuration file options into global and backend-specific categories, describing each option and its default value (if any), and giving an example of its use.
Options described in this section apply to all backends, unless specifically overridden in a backend definition. Option arguments that should be replaced by actual text are shown in brackets <>.
This option grants access (specified by <accesslevel>) to a set of entries and/or attributes (specified by <what>) by one or more requesters (specified by <who>). See Section 5.3 on access control for more details and examples.
This option associates a syntax with an attribute name. By default, an attribute is assumed to have syntax cis. An optional alternate name can be given for an attribute. The possible syntaxes and their meanings are
This option specifies the default access to grant requesters not matched by any other access line (see Section 5.3). Note that an access level implies all lesser access levels (e.g., write access implies read, search and compare).
Default:
defaultaccess read
This option specifies that slapd should read additional configuration information from the given file before continuing with the next line of the current file. The included file should follow the normal slapd config file format.
This option specifies the level at which debugging statements and operation statistics should be syslogged (currently logged to the syslogd(8) LOG_LOCAL4 facility). You must have compiled slapd with DLDAP_DEBUG for this to work (except for the two stats levels, which are always enabled). Log levels are additive. To display what numbers correspond to what kind of debugging, invoke slapd with the ? flag or consult the table below. The possible values for <integer> are:
Example:
loglevel 255
This will cause lots and lots of debugging information to be syslogged.
Default:
loglevel 256
This option defines the schema rules for the given object class. Used in conjunction with the schemacheck option. See Section 5.4 for more details.
This option specifies the referral to pass back when slapd cannot find a local database to handle a request.
Example:
referral ldap://ldap.itd.umich.edu
This will refer non-local queries to the LDAP server at the University of Michigan. Smart LDAP clients can re-ask their query at that server, but note that most of these clients are only going to know how to handle simple LDAP URLs that contain a host part and optionally a distinguished name part.
This option turns schema checking on or off. If schema checking is on, entries added or modified will be checked to ensure they obey the schema rules implied by their object class(es) as defined by the corresponding objectclass option(s). If schema checking is off this check is not done.
Default:
schemacheck off
This option specifies the maximum number of entries to return from a search operation.
Default:
sizelimit 500
This option specifies the srvtab file in which slapd can find the kerberos keys necessary for authenticating clients using kerberos. This option is only meaningful if you are using kerberos authentication, which must be enabled at compile time by including the appropriate definitions in the Make-common file.
Default:
srvtab /etc/srvtab
This option specifies the maximum number of seconds (in real time) slapd will spend answering a search request. If a request is not finished in this time, a result indicating an exceeded timelimit will be returned.
Default:
timelimit 3600
Options in this section only apply to the backend in which they are defined. They are supported by every type of backend.
This option marks the beginning of a new database instance definition. <databasetype> should be one of ldbm, shell, or passwd, depending on which backend will serve the database.
Example:
database ldbm
This marks the beginning of a new LDBM backend database instance definition.
This option controls whether slapd will automatically maintain the modifiersName, modifyTimestamp, creatorsName, and createTimestamp attributes for entries.
Default:
lastmod off
This option puts the database into "read-only" mode. Any attempts to modify the database will return an "unwilling to perform" error.
Default:
readonly off
 replica host=<hostname>[:<port>]
 "binddn=<DN>"
 bindmethod={ simple | kerberos }
 \[credentials=<password>]
 \[srvtab=<filename>]
This option specifies a replication site for this database. The host= parameter specifies a host and optionally a port where the slave slapd instance can be found. Either a domain name or IP address may be used for <hostname>. If <port> is not given, the standard LDAP port number (389) is used.
The binddn= parameter gives the DN to bind as for updates to the slave slapd. It should be a DN which has read/write access to the slave slapd's database, typically given as a "rootdn" in the slave's config file. It must also match the updatedn option in the slave slapd's config file. Since DNs are likely to contain embedded spaces, the entire " binddn=<DN>" string should be enclosed in quotes.
bindmethod is either simple or kerberos, depending on whether simple password-based authentication or kerberos authentication is to be used when connecting to the slave slapd. Simple authentication requires a valid password be given. Kerberos authentication requires a valid srvtab file.
The credentials= parameter, which is only required if using simple authentication, gives the password for binddn on the slave slapd.
The srvtab= parameter, which is only required if using kerberos, specifies the filename which holds the kerberos key for the slave slapd. If omitted, /etc/srvtab is used.
See Section 10 for more details on replication.
This option specifies the name of the replication log file to which slapd will log changes. The replication log is typically written by slapd and read by slurpd. Normally, this option is only used if slurpd is being used to replicate the database. However, you can also use it to generate a transaction log, if slurpd is not running. In this case, you will need to periodically truncate the file, since it will grow indefinitely otherwise.
See Section 10 for more details on replication.
This option specifies the DN of an entry that is not subject to access control or administrative limit restrictions for operations on this database.
Example:
rootdn "cn=Manager, o=U of M, c=US"
This option specifies a kerberos name for the DN given above that will always work, regardless of whether an entry with the given DN exists or has a krbName attribute. This option is useful when creating a database and also when using slurpd to provide replication service (see Section 10).
Example:
rootkrbname admin@umich.edu
This option specifies a password for the DN given above that will always work, regardless of whether an entry with the given DN exists or has a password. This option is useful when creating a database and also when using slurpd to provide replication service (see Section 10).
Example:
rootpw secret
This option specifies the DN suffix of queries that will be passed to this backend database. Multiple suffix lines can be given, and at least one is required for each database definition.
Example:
suffix "o=University of Michigan, c=US"
Queries with a DN ending in "o=University of Michigan, c=US" will be passed to this backend.
This option is only applicable in a slave slapd. It specifies the DN allowed to make changes to the replica (typically, this is the DN slurpd binds as when making changes to the replica).
Options in this category only apply to the LDBM backend database. That is, they must follow a "database ldbm" line and come before any other "database" line.
This option specifies the size in entries of the in-memory cache maintained by the LDBM backend database instance.
Default:
cachesize 1000
This option specifies the size in bytes of the in-memory cache associated with each open index file. If not supported by the underlying database method, this option is ignored without comment. Increasing this number uses more memory but can cause a dramatic performance increase, especially during modifies or when building indexes.
Default:
dbcachesize 100000
This option specifies the directory where the LDBM files containing the database and associated indexes live.
Default:
directory /usr/tmp
This option specifies the indexes to maintain for the given attribute. If only an <attrlist> is given, all possible indexes are maintained.
Example:
 index cn
 index sn,uid eq,sub,approx
 index default none
This example causes all indexes to be maintained for the cn attribute; equality, substring, and approximate indexes for the sn and uid attributes; and no indexes for all other attributes.
This option specifies the file protection mode that newly created database index files should have.
Default:
mode 0600
 bind <pathname>
 unbind <pathname>
 search <pathname>
 compare <pathname>
 modify <pathname>
 modrdn <pathname>
 add <pathname>
 delete <pathname>
 abandon <pathname>
These options specify the pathname of the command to execute in response to the given LDAP operation. The command given should understand and follow the input/output conventions described in Appendix B.
Example:
search /usr/local/bin/search.sh
Note that you need only supply those commands you want the backend to handle. Operations for which a command is not supplied will be refused with an "unwilling to perform" error.
Options in this category only apply to the PASSWD backend database. That is, they must follow a "database passwd" line and come before any other "database" line.
This option specifies an alternate passwd file to use.
Default:
file /etc/passwd
Access to slapd entries and attributes is controlled by the access configuration file directive. The general form of an access line is:
 <access directive> ::= access to <what>
 [ by <who> <access> ]+
 <what> ::= * | [ dn=<regex> ] [ filter=<ldapfilter> ]
 [ attrs=<attrlist> ]
 <who> ::= * | self | dn=<regex> | addr=<regex> |
 domain=<regex> | dnattr=<dn attribute>
 <access> ::= [self]none | [self]compare | [self]search
 | [self]read | [self]write
where the <what> part selects the entries and/or attributes to which the access applies, the <who> part specifies which entities are granted access, and the <access> part specifies the access granted. Multiple <who> <access> pairs are supported, allowing many entities to be granted different access to the same set of entries and attributes.
The <what> part of an access specification determines the entries and attributes to which the access control applies. Entries can be selected in two ways: by a regular expression matching the entry's distinguished name:
dn=<regular expression>
Or, entries may be selected by a filter matching some attribute(s) in the entry:
filter=<ldap filter>
where <ldap filter> is a string representation of an LDAP search filter, as described in RFC 1588. The special entry selector "*" is used to select any entry, and is a convenient shorthand for the equivalent "dn=.*" selector.
Attributes within an entry are selected by including a comma-separated list of attribute names in the <what> selector:
attrs=<attribute list>
Access to the entry itself must be granted or denied using the special attribute name "entry". Note that giving access to an attribute is not enough; access to the entry itself through the "entry" attribute is also required. The complete examples at the end of this section should help clear things up.
The <who> part identifies the entity or entities being granted access. Note that access is granted to "entities" not "entries." Entities can be specified by the special "*" identifier, matching any entry, the keyword "self" matching the entry protected by the access, or by a regular expression matching an entry's distinguished name:
dn=<regular expression>
Or entities can be specified by a regular expression matching the client's IP address or domain name:
 addr=<regular expression>
 domain=<regular expression>
or by an entry listed in a DN-valued attribute in the entry to which the access applies:
dnattr=<dn-valued attribute name>
The dnattr specification is used to give access to an entry whose DN is listed in an attribute of the entry (e.g., give access to a group entry to whoever is listed as the owner of the group entry).
The kind of <access> granted can be one of the following:
none | compare | search | read | write
Note that each level implies all lower levels of access. So, for example, granting someone write access to an entry also grants them read, search, and compare access.
When evaluating whether some requester should be given access to an entry and/or attribute, slapd compares the entry and/or attribute to the <what> selectors given in the configuration file. Access directives local to the current database are examined first, followed by global access directives. Within this priority, access directives are examined in the order in which they appear in the config file. Slapd stops with the first <what> selector that matches the entry and/or attribute. The corresponding access directive is the one slapd will use to evaluate access.
Next, slapd compares the entity requesting access to the <who> selectors within the access directive selected above, in the order in which they appear. It stops with the first <who> selector that matches the requester. This determines the access the entity requesting access has to the entry and/or attribute.
Finally, slapd compares the access granted in the selected <access> clause to the access requested by the client. If it allows greater or equal access, access is granted. Otherwise, access is denied.
The order of evaluation of access directives makes their placement in the configuration file important. If one access directive is more specific than another in terms of the entries it selects, it should appear first in the config file. Similarly, if one <who> selector is more specific than another it should come first in the access directive. The access control examples given below should help make this clear.
The access control facility described above is quite powerful. This section shows some examples of its use. First, some simple examples:
access to * by * read
This access directive grants read access to everyone. If it appears alone it is the same as the following defaultaccess line.
defaultaccess read
The following example shows the use of a regular expression to select the entries by DN in two access directives where ordering is significant.
 access to dn=".*, o=U of M, c=US"
        by * search
 access to dn=".*, c=US"
        by * read
Read access is granted to entries under the c=US subtree, except for those entries under the "o=University of Michigan, c=US" subtree, to which search access is granted. If the order of these access directives was reversed, the U-M-specific directive would never be matched, since all U-M entries are also c=US entries.
The next example again shows the importance of ordering, both of the access directives and the "by" clauses. It also shows the use of an attribute selector to grant access to a specific attribute and various <who> selectors.
access to dn=".*, o=U of M, c=US" attr=homePhone
        by self write
        by dn=".*, o=U of M, c=US" search
        by domain=.*\.umich\.edu read
        by * compare
access to dn=".*, o=U of M, c=US"
        by self write
        by dn=".*, o=U of M, c=US" search
        by * none
This example applies to entries in the "o=U of M, c=US" subtree. To all attributes except homePhone, the entry itself can write them, other U-M entries can search by them, anybody else has no access. The homePhone attribute is writable by the entry, searchable by other U-M entries, readable by clients connecting from somewhere in the umich.edu domain, and comparable by everybody else.
Sometimes it is useful to permit a particular DN to add or remove itself from an attribute. For example, if you would like to create a group and allow people too add and remove only their own DN from the member attribute, you could accomplish it with an access directive like this:
 access to attr=member,entry
        by dnattr=member selfwrite
The dnattr <who> selector says that the access applies to entries listed in the member attribute. The selfwrite access selector says that such members can only add or delete their own DN from the attribute, not other values. The addition of the entry attribute is required because access to the entry is required to access any of the entry's attributes.
Note that the attr=member construct in the <what> clause is a shorthand for the clause "dn=* attr=member" (i.e., it matches the member attribute in all entries).
The objectclass and schemacheck configuration file options can be used to enforce schema rules on entries in the directory. The schema rules are defined by one or more objectclass lines, and enforcement is turned on or off via the schemacheck option. The format of an objectclass line is:
 objectclass <name>
        [ requires <attrs> ]
        [ allows <attrs> ]
This option defines the schema rules for the object class given by <name>. Schema rules consist of the attributes the entry is required to have (given by the requires <attrs> clause) and those attributes that it may optionally have (given by the allows <attrs> clause). In both clauses, <attrs> is a comma-separated list of attribute names.
Note that object class inheritance (that is, defining one object class in terms of another) is not supported directly. All of an object class's required and allowed attributes must be listed in the objectclass definition.
For example, to define an objectclass called myPerson, you might include a definition like this:
 objectclass myperson
        requires cn, sn, objectclass
        allows mail, phone, fax
To then enforce this rule (i.e., to make sure an entry with an objectclass of myperson contains the cn, sn and objectclass attributes, and that it contains no other attributes besides mail, phone, and fax), turn on schema checking with a line like this:
schemacheck on
The following is an example configuration file, interspersed with explanatory text. It defines two databases to handle different parts of the X.500 tree; both are LDBM database instances. The line numbers shown are provided for reference only and are not included in the actual file. First, the global configuration section:
 1. # example config file - global configuration section
 2. include /usr/local/etc/slapd.at.conf
 3. include /usr/local/etc/slapd.oc.conf
 4. schemacheck on
 5. referral ldap://ldap.itd.umich.edu
Line 1 is a comment. Lines 2 and 3 include other config files containing attribute and object class definitions, respectively. Line 4 turns on schema checking. The referral option on line 5 means that queries not local to one of the databases defined below will be referred to the LDAP server running on the standard port (389) at the host ldap.itd.umich.edu.
The next section of the configuration file defines an LDBM backend that will handle queries for things in the "o=University of Michigan, c=US" portion of the tree. The database is to be replicated to two slave slapds, one on truelies, the other on judgmentday. Indexes are to be maintained for several attributes, and the userPassword attribute is to be protected from unauthorized access.
 1. # ldbm definition for the U-M database
 2. database ldbm
 3. suffix "o=University of Michigan, c=US"
 4. directory /usr/local/ldbm-umich
 6. rootdn "cn=Manager, o=University of Michigan, c=US"
 7. rootpw secret
 8. replogfile /usr/local/ldbm-umich/slapd.replog
 9. replica host=truelies.rs.itd.umich.edu:389
 10. binddn="cn=Replicator, o=U of M, c=US"
 11. bindmethod=simple credentials=secret
 12.replica host=judgmentday.rs.itd.umich.edu
 13. binddn="cn=Replicator, o=U of M, c=US"
 14. bindmethod=kerberos
 15. srvtab=/etc/srvtab.judgmentday
 16.# ldbm indexed attribute definitions
 17.index cn,sn,uid pres,eq,approx,sub
 18.index objectclass pres,eq
 19.index default none
 20.# ldbm access control definitions
 21.defaultaccess read
 22.access to attr=userpassword
 23. by self write
 24. by dn="cn=Admin, o=University of Michigan, c=US" write
 25. by * compare
Line 1 is a comment. The start of the database definition is marked by the database keyword on line 2. Line 3 specifies the DN suffix for queries to pass to this database. Line 4 specifies the directory in which the database files will live
Lines 6 and 7 identify the database "super user" entry and associated password. This entry is not subject to access control or size or time limit restrictions.
Lines 8 through 15 are for replication. Line 8 specifies the replication log file (where changes to the database are logged - this file is written by slapd and read by slurpd). Lines 9 through 11 specify the hostname and port for a replicated host, the DN to bind as when performing updates, the bind method (simple) and the credentials (password) for the binddn. Lines 12 through 15 specify a second replication site, using kerberos instead of simple authentication. See Section 10 on slurpd for more information on these options.
Lines 16 through 19 indicate the indexes to maintain for various attributes. The default is not to maintain any indexes (line 19).
Lines 20 through 25 specify access control for entries in the database. For all entries, the userPassword attribute is writable by the entry and the "admin" entry, comparable by everyone else. All other attributes allow read access by default (line 21). Note that the special "entry" attribute is not required in the access directive beginning on line 22. This is because the default access is read.
The next section of the example configuration file defines another LDBM database. This one handles queries involving the "o="Babs, Inc.", c=US" subtree.
 1. # ldbm definition for Babs, Inc. database
 2. database ldbm
 3. suffix "o=\"Babs, Inc.\", c=US"
 4. directory /usr/local/ldbm-babs
 5. rootdn "cn=Babs, o=\"Babs, Inc.\", c=US"
 6. index default
Note the use of `\' to escape the quotes necessary in the distinguished names given on lines 3 and 5. By default, all indexes are maintained for every attribute in an entry.
Slapd can be run in two different modes, stand-alone or from inetd(8). Stand-alone operation is recommended, especially if you are using the LDBM backend. This allows the backend to take advantage of caching and avoids concurrency problems with the LDBM index files. If you are running only a PASSWD or SHELL backend, running from inetd is an option. How to do this is described in the next section, after the command-line options and stand-alone daemon operation are described.
Slapd supports the following command-line options.
-d <level> | ?
This option sets the slapd debug level to <level>. When level is a `?' character, the various debugging levels are printed and slapd exits, regardless of any other options you give it. Current debugging levels are
     1 trace function calls
     2 debug packet handling
     4 heavy trace debugging
     8 connection management
    16 print out packets sent and received
    32 search filter processing
    64 configuration file processing
   128 access control list processing
   256 stats log connections/operations/results
   512 stats log entries sent
  1024 print communication with shell backends
  2048 print entry parsing debugging
 65535 enable all debugging
Debugging levels are additive. That is, if you want to trace function calls and watch the config file being processed, you would set level to the sum of those two levels (in this case, 65). Consult <ldap.h> for more details.
-f <filename>
This option specifies an alternate configuration file for slapd.
-i
This option tells slapd that it is running from inetd instead of as a stand-alone server. See the next section on running slapd from inetd for more details.
-p <port>
This option specifies an alternate TCP port on which slapd should listen for connections. The default port is 389.
In general, slapd is run like this:
$(ETCDIR)/slapd [<option>]*
where ETCDIR has the value you gave in the Make-common file during the pre-build configuration, and <option> is one of the options described below. Unless you have specified a debugging level, slapd will automatically fork and detach itself from its controlling terminal and run in the background. Any of the options given above can be given to slapd to point it at a different configuration file, listen on another port, etc.
To kill off slapd safely, you should give a command like this
kill -TERM `cat $(ETCDIR)/slapd.pid`
Killing slapd by a more drastic method may cause its LDBM databases to be corrupted, as it may need to flush various buffers before it exits. Note that slapd writes its pid to a file called slapd.pid in the ETCDIR you configured in Make-common. You can change the location of this pid file by changing the SLAPD_PIDFILE variable in include/ldapconfig.h.edit.
Slapd will also write its arguments to a file called slapd.args in the ETCDIR you configured in Make-common. You can change the location of the args file by changing the SLAPD_ARGSFILE variable in include/ldapconfig.h.edit.
First, make sure that running from inetd(8) is a good idea. If you are using the LDBM backend, it is not. If you are in a high-volume environment, the overhead of running from inetd also makes it a bad idea. Otherwise, you may proceed with the two steps necessary.
Step 1 is to add a line like this to your /etc/services file:
ldap 389 # ldap directory service
Step 2 is to add a line like this to your /etc/inetd.conf file:
ldap stream tcp nowait nobody $(ETCDIR)/slapd slapd -i
where ETCDIR has the value you gave it in the Make-common file during pre-build configuration. Finally, send inetd a HUP signal, and you should be all set.
Slapd supports a monitoring interface you can use to find out many useful bits of information about what slapd is currently doing, how many connections it has, how many threads are working, etc. You can access the monitor feature by doing a base object search of the SLAPD_MONITOR_DN from include/ldapconfig.h with any kind of valid filter (e.g., "(objectclass=*)"). By default, this DN is set to "cn=monitor". You will get one entry returned to you, with the following attributes:
version: slapd <version> (<date>)
This attribute identifies the slapd server software by name, version, and build date, e.g., slapd 3.3 (Thu May 21 14:19:03 EDT 1996)
threads: <integer>
This attribute indicates the number of threads (operations) currently outstanding in slapd.
 connection: <fd> : <opentime> : <opsinitiated> :
        <opscompleted> : <binddn> : [ <rw> ]
This multi-valued attribute summarizes information for each open connection. The information given is <fd>, the file descriptor; <opentime>, the time the connection was opened in UTC format; <opsinitiated>, the number of operations initiated over the connection; <opscompleted>, the number of operations completed over the connection; <binddn>, the DN currently bound to the connection; and optionally <rw>, indicating whether the connection is currently blocked for read or write..
currentconnections: <integer>
The current number of connections.
totalconnections: <integer>
The total number of connections handled by slapd since it started.
dtablesize: <integer>
The size of slapd's file descriptor table.
writewaiters: <integer>
The number of threads blocked waiting to write data to a client.
readwaiters: <integer>
The number of threads blocked waiting to read data from a client.
opsinitiated: <integer>
The total number of operations initiated by slapd since it started.
opscompleted: <integer>
The total number of operations completed by slapd since it started.
entriessent: <integer>
The total number of entries sent to clients by slapd since it started.
bytessent: <integer>
The total number of bytes sent to clients by slapd since it started.
currenttime: <UTC time>
Slapd's idea of the current time.
starttime: <integer>
The time slapd was started.
nbackends: <integer>
The number of backends currently being served by slapd.
concurrency: <integer>
Under Solaris 2.x only, an indication of the current level of thread concurrency.
Note that slapd takes a snapshot of this information and returns it to you. No attempt is made to ensure that the information is consistent (i.e., if an operation thread is modifying one of these things when the monitor thread is reading it, strange results could be returned).
You should be able to use any LDAP client to retrieve this information. Here's how you might do it using the ldapsearch(1) client:
ldapsearch -s base -b cn=monitor 'objectclass=*'
This section tells you how to create a slapd database from scratch, and how to do trouble shooting if you run into problems. There are two ways to create a database. First, you can create the database on-line using LDAP. With this method, you simply start up slapd and add entries using the LDAP client of your choice. This method is fine for relatively small databases (a few hundred or thousand entries, depending on your requirements).
The second method of database creation is to do it off-line, using the index generation tools. This method is best if you have many thousands of entries to create, which would take an unacceptably long time using the LDAP method, or if you want to ensure the database is not accessed while it is being created.
With this method, you use the LDAP client of your choice (e.g., the ldapadd(1) tool) to add entries, just like you would once the database is created. You should be sure to set the following configuration options before starting slapd:
suffix <dn>
As described in the preceding section, this option says what entries are to be held by this database. You should set this to the DN of the root of the subtree you are trying to create. For example
suffix "o=University of Michigan, c=US"
You should be sure to specify a directory where the index files should be created:
directory <directory>
For example:
directory /usr/local/openldap/slapd
You need to make it so you can connect to slapd as somebody with permission to add entries. This is done through the following two options in the database definition:
        rootdn <dn>
        rootpw <passwd>
These options specify a DN and password that can be used to authenticate as the "superuser" entry of the database (i.e., the entry allowed to do anything). The DN and password specified here will always work, regardless of whether the entry named actually exists or has the password given. This solves the chicken-and-egg problem of how to authenticate and add entries before any entries yet exist.
Finally, you should make sure that the database definition contains the index definitions you want:
index {<attrlist> | default} [pres,eq,approx,sub,none]
For example, to index the cn, sn, uid and objectclass attributes the following index configuration lines could be used.
        index cn,sn,uid
        index objectclass pres,eq
        index default none
See Section 4 on the configuration file for more details on this option. Once you have configured things to your liking, start up slapd, connect with your LDAP client, and start adding entries. For example, to add a the U of M entry followed by a Postmaster entry using the ldapadd tool, you could create a file called /tmp/newentry with the contents:
 o=University of Michigan, c=US
 objectClass=organization
 o=University of Michigan
 description=University of Michigan at Ann Arbor
 cn=Postmaster, o=University of Michigan, c=US
 objectClass=organizationalRole
 cn=Postmaster
 description=U of M postmaster - postmaster@umich.edu
and then use a command like this to actually create the entry:
 ldapadd -f /tmp/newentry -D "cn=Manager, o=University of
        Michigan, c=US" -w secret
The above command assumes that you have set rootdn to "cn=Manager, o=University of Michigan, c=US" and rootpw to "secret".
The second method of database creation is to do it off-line, using the index generation tools described below. This method is best if you have many thousands of entries to create, which would take an unacceptably long time using the LDAP method described above. These tools read the slapd configuration file and an input file containing a text representation of the entries to add. They produce the LDBM index files directly. There are several important configuration options you will want to be sure and set in the config file database definition first:
suffix <dn>
As described in the preceding section, this option says what entries are to be held by this database. You should set this to the DN of the root of the subtree you are trying to create. For example
suffix "o=University of Michigan, c=US"
You should be sure to specify a directory where the index files should be created:
directory <directory>
For example:
directory /usr/local/openldap-slapd
Next, you probably want to increase the size of the in-core cache used by each open index file. For best performance during index creation, the entire index should fit in memory. If your data is too big for this, or your memory too small, you can still make it pretty big and let the paging system do the work. This size is set with the following option:
dbcachesize <integer>
For example:
dbcachesize 50000000
This would create a cache 50 MB big, which is pretty big (at U-M, our database has about 125K entries, and our biggest index file is about 45 MB). Experiment with this number a bit, and the degree of parallelism (explained below), to see what works best for your system. Remember to turn this number back down once your index files are created and before you run slapd.
Finally, you need to specify which indexes you want to build. This is done by one or more index options.
index {<attrlist> | default} [pres,eq,approx,sub,none]
For example:
        index cn,sn,uid pres,eq,approx
        index default none
This would create presence, equality and approximate indexes for the cn, sn, and uid attributes, and no indexes for any other attributes. See the configuration file section for more information on this option.
Once you've configured things to your liking, you create the indexes by running the ldif2ldbm program:
        ldif2ldbm -i <inputfile> -f <slapdconfigfile>
                [-d <debuglevel>] [-j <integer>]
                [-n <databasenumber>] [-e <etcdir>]
The arguments have the following meanings:
-i <inputfile>
Specifies the LDIF input file containing the entries to add in text form (described below in Section 8.3).
-f <slapdconfigfile>
Specifies the slapd configuration file that tells where to create the indexes, what indexes to create, etc.
-d <debuglevel>
Turn on debugging, as specified by <debuglevel>. The debug levels are the same as for slapd (see Section 6.1).
-j <integer>
An optional argument that specifies that at most <integer> processes should be started in parallel when building the indexes. The default is 1. If set to a value greater than one, ldif2ldbm will create at most that many subprocesses at a time when building the indexes. A separate subprocess is created to build each attribute index. Running these processes in parallel can speed things up greatly, but beware of creating too many processes, all competing for memory and disk resources.
-n <databasenumber>
An optional argument that specifies the configuration file database for which to build indices. The first database listed is "1", the second "2", etc. By default, the first ldbm database in the configuration file is used.
-e <etcdir>
An optional argument that specifies the directory where ldif2ldbm can find the other database conversion tools it needs to execute ( ldif2index and friends). The default is the installation ETCDIR.
The next sections describe the programs invoked by ldif2ldbm when it is building indexes. Normally, these programs are invoked for you, but occasionally you may want to invoke them yourself.
Sometimes it may be necessary to create a new attribute index file without disturbing the rest of the database. This is possible using the ldif2index program. ldif2index is invoked like this
        ldif2index -i <inputfile> -f <slapdconfigfile>
                [-d <debuglevel>] [-n <databasenumber>] <attr>
Where the -i, -f, -d, and -n options are the same as for the ldif2ldbm program. <attr> is the attribute to build an index for. Which indexes are built (e.g., equality, substring, etc.) is controlled by the corresponding index line in the slapd configuration file.
You can use the ldbmcat program to create a suitable LDIF input file from an existing LDBM database.
The ldif2id2entry program is normally invoked from ldif2ldbm. It is used to convert an LDIF text file into an id2entry index. It is unlikely that you would need to invoke it yourself, but if you do it works like this
        ldif2id2entry -i <inputfile> -f <slapdconfigfile>
                [-d <debuglevel>] [-n <databasenumber>]
The arguments are the same as for the ldif2ldbm program.
The ldif2id2children program is normally invoked from ldif2ldbm. It is used to convert an LDIF text file into id2children and dn2id indexes. Occasionally, it may be necessary to run this program yourself, for example if one of these indexes has become corrupted. ldif2id2children is invoked like this
        ldif2id2children -i <inputfile> -f <slapdconfigfile>
                [-d <debuglevel>] [-n <databasenumber>]
The arguments are the same as for the ldif2ldbm program. You can use the ldbmcat program to create a suitable LDIF input file from an existing LDBM database.
The ldbmcat program is used to convert an id2entry index back into its LDIF text format. This can be useful when you want to make a human-readable backup of your database, or as an intermediate step in creating a new index using the ldif2index program. The program is invoked like this:
ldbmcat [-n] <filename>
where <filename> is the name of the id2entry index file. The corresponding LDIF output is written to standard output.
The -n option can be used to prevent the printing of entry IDs in the LDIF format. If you are creating an LDIF format for use as input to ldif2index or anything by ldif2ldbm, you should not use the -n option (because the entry IDs must match those already in the id2entry file). If you are just making a backup of your data, you can use the -n option to save space.
The ldif program is used to convert arbitrary data values to LDIF format. This can be useful when writing a program or script to create the LDIF file you will feed into the ldif2ldbm program, or when writing a SHELL backend. ldif takes an attribute name as an argument, and reads the attribute value(s) from standard input. It produces the LDIF formatted attribute line(s) on standard output. The usage is:
ldif [-b] <attrname>
where <attrname> is the name of the attribute. Without the
The -b option can be used to force ldif to interpret its input as a single raw binary value. This option is useful when converting binary data such as a jpegPhoto or audio attribute.
The LDAP Data Interchange Format (LDIF) is used to represent LDAP entries in a simple text format. The basic form of an entry is:
        [<id>]
        dn: <distinguished name>
        <attrtype>: <attrvalue>
        <attrtype>: <attrvalue>

        ...
where <id> is the optional entry ID (a positive decimal number). Normally, you would not supply the <id>, allowing the database creation tools to do that for you. The ldbmcat program, however, produces an LDIF format that includes <id> so that new indexes created will be consistent.
A line may be continued by starting the next line with a single space or tab character. e.g.,
dn: cn=Barbara J Jensen, o=University of Michigan, c=US
Multiple attribute values are specified on separate lines. e.g.,
        cn: Barbara J Jensen
        cn: Babs Jensen
If an <attrvalue> contains a non-printing character, or begins with a space or a colon `:', the <attrtype> is followed by a double colon and the value is encoded in base 64 notation. e.g., the value " begins with a space" would be encoded like this:
cn:: IGJlZ2lucyB3aXRoIGEgc3BhY2U=
Multiple entries within the same LDIF file are separated by blank lines. Here's an example of an LDIF file containing three entries.
        dn: cn=Barbara J Jensen, o=University of Michigan, c=US
        cn: Barbara J Jensen
        cn: Babs Jensen
        objectclass: person
        sn: Jensen


        dn: cn=Bjorn J Jensen, o=University of Michigan, c=US
        cn: Bjorn J Jensen
        cn: Bjorn Jensen
        objectclass: person
        sn: Jensen

        dn: cn=Jennifer J Jensen, o=University of Michigan, c=US
        cn: Jennifer J Jensen
        cn: Jennifer Jensen
        objectclass: person
        sn: Jensen
        jpegPhoto:: /9j/4AAQSkZJRgABAAAAAQABAAD/2wBDABALD
        A4MChAODQ4SERATGCgaGBYWGDEjJR0oOjM9PDkzODdASFxOQ
        ERXRTc4UG1RV19iZ2hnPk1xeXBkeFxlZ2P/2wBDARESEhgVG

        ...
Notice that the jpegPhoto in Jennifer Jensen's entry is encoded using base 64. The ldif program (described in Section 8.2.6) can be used to produce the LDIF format.
If you have directory data that is or was held in a QUIPU DSA (available as part of the ISODE package), you will want to convert the EDB files used by QUIPU into an LDIF file. The edb2ldif program is provided to do most of the conversion for you. Once you have an LDIF file, you should follow the steps outlined in section 6.2 above to build an LDBM database for slapd.
The edb2ldif program is invoked like this:
 edb2ldif [-d] [-v] [-r] [-o] [-b <basedn>]
        [-a <addvalsfile>] [-f <fileattrdir>]
        [-i <ignoreattr...>] [<edbfile...>]
The LDIF data is written to standard output. The arguments have the following meanings:
-d
This option enables some debugging output on standard error.
-v
Enable verbose mode that writes status information to standard error, such as which EDB file is being processed, how many entries have been converted so far, etc.
-r
Recurse through child directories, processing all EDB files found.
-o
Cause local .add file definitions to override the global addfile (see -a below)
-b <basedn>
Specify the Distinguished Name that all EDB file entries appear below.
-a <addvalsfile>
The LDIF information contained in this file will be appended to each entry.
-f <fileattrdir>
Specify a single directory where all file-based attributes (typically sounds and images) can be found. If this option is not given, file attributes are assumed to be located in the same directory as the EDB file that refers to them.
-i <ignoreattr>
Specify an attribute that should not be converted. You can include as many -i flags as necessary.
<edbfile>
Specify a particular EDB file (or files) to read data from. By default, the EDB.root (if it exists) and EDB files in the current directory are used.
When edb2ldif is invoked, it will also look for files named
The basic steps to follow when converting your EDB format data to an LDIF file are:
Occasionally you may find it useful to look at the LDBM database and index files directly (i.e., without going through slapd). The ldbmtest program is provided for this purpose. It gives you raw access to the database itself. ldbmtest should be run line this:
ldbmtest [-d <debuglevel>] [-f <slapdconfigfile>]
The default configuration file in the ETCDIR is used if you don't supply one. By default, ldbmtest operates on the last database listed in the config file. You can specify an alternate database, or see the current database with the following commands.
        b specify an alternate backend database
        B print out the current backend database
The b command will prompt you for the suffix associated with the database you want. The database you select can be viewed and modified using a set of two-letter commands. The first letter selects the command function to perform. Possible commands and their meanings are as follows.
        l lookup (do not follow indirection)
        L lookup (follow indirection)
        t traverse and print keys and data
        T traverse and print keys only
        x delete an index item
        e edit an index item
        a add an index item
        c create an index file
        i insert an entry into an index item
The second letter indicates which index the command applies to. The possible index selections are as follows.
        c id2children index
        d dn2id index
        e id2entry index
        f arbitrary file name
        i attribute index
Each command may require additional arguments which ldbmtest will prompt you for.
To exit ldbmtest, type control-D or control-C.
Note that this is a very raw interface originally developed when testing the database format. It is provided and minimally documented here for interested parties, but it is not meant to be used by the inexperienced. See the next section for a brief description of the LDBM database format.
In normal operation, it is not necessary for you to know much about the LDBM database format. If you are going to use the ldbmtest program to look at or alter the database, or if you want a deeper understanding of how indexes are maintained, some knowledge of how it works could be useful. This section gives an overview of the database format and how slapd makes use of it.
The LDBM database works by assigning a compact four-byte unique identifier to each entry in the database. It uses this identifier to refer to entries in indexes. The database consists of one main index file, called id2entry, which maps from an entry's unique identifier (EID) to a text representation of the entry itself. Other index files are maintained, for each indexed attribute for example, that map values people are likely to search on to lists of EIDs.
Using this simple scheme, many LDAP queries can be answered efficiently. For example, to answer a search for entries with a surname of "Jensen", slapd would first consult the surname attribute index, look up the value "Jensen" and retrieve the corresponding list of EIDs. Next, slapd would look up each EID in the id2entry index, retrieve the corresponding entry, convert it from text to LDAP format, and return it to the client.
The following sections give a very brief overview of each type of index and what it contains. For more detailed information see the paper "An X.500 and LDAP Database: Design and Implementation," available in postscript format from
ftp://terminator.rs.itd.umich.edu/ldap/papers/xldbm.ps
The LDBM backend will maintain one index file for each attribute it is asked to index. Several sets of keys must coexist in this file (e.g., keys for equality and approximate equality), so the keys are prefixed with a character to ensure uniqueness. The prefixes are given in the table below
        = equality keys
        ~ approximate equality keys
        * substring equality keys
        \ continuation keys
Key values are also normalized (e.g., converted to upper case for case ignore attributes). So, for example, to look up the surname equality value in the example above using the ldbmtest program, you would look up the value " =JENSEN".
Substring indexes are maintained by generating all possible N-character substrings for a value (N is 3 by default). These substrings are then stored in the attribute index, prefixed by "*". Additional anchors of "^" and "$" are added at the beginning and end of words. So, for example the surname of Jensen would cause the following keys to be entered in the index: ^JE, JEN, ENS, NSE, SEN, EN$.
Approximate values are handled in a similar way, with phonetic codes being generated for each word in a value and then stored in the index, prefixed by "~".
Large blocks in the index are split into smaller ones. The smaller blocks are accessed through a level of indirection provided by the original block. They are stored in the index using the continuation key prefix of "\".
In addition to the id2entry and attribute indexes, LDBM maintains a number of other indexes, including the dn2id index and the id2children index. These indexes provide the mapping between a DN and the corresponding EID, and the mapping between an EID and the EIDs of the corresponding entry's children, respectively.
The dn2id index stores normalized DNs as keys. The data stored is the corresponding EID.
The id2children index stores EIDs as keys. The data stored is a list of EIDs, just as for the attribute indexes.
There are several things you can do to tune the performance of slapd for your system. Most of them have to do with the LDBM backend. LDBM uses an index mechanism to store and retrieve information in slapd. Each entry is assigned a unique ID, used to refer to the entry in the indexes. A search for entries with a surname of "Jensen", for example, would look up the index entry "=JENSEN" in the surname index. The data returned is a list of IDs of entries having that value for the surname attribute. We have found several things to be useful in improving the performance of this indexing scheme, especially on modify operations.
Some index entries become so large as to be useless. For example, if every entry in your database is a person entry, the "=PERSON" index entry in the objectclass index contains every entry. This returns very little useful information, and can cause significant delays, especially on updates. To alleviate this problem, we have introduced the idea of an allIDs index entry.
The allIDs entry stands for a real index entry containing the IDs of every entry in the database, but it takes up very little space, never needs updating, and can be manipulated quickly and efficiently. The trade-off is that it does not prune the set of candidate entries at all during a search. This must be done using other, more "high-powered" index entries.
You can set the minimum number of IDs that an index entry may contain before it turns into an allIDs block by changing the SLAPD_LDBM_MIN_MAXIDS variable in the include/ldapconfig.h file. The actual number is determined at runtime by the LDBM backend, depending on the block size of the underlying device (i.e., the number you provide is rounded up to the nearest multiple of a block size).
The LDBM backend can be configured to keep a cache of entries in memory. Since the LDBM database spends much of its time reading entries from the id2entry file into memory, this cache can greatly speed performance. The trade-off is that the cache uses some extra memory. The default cache size is 1000 entries. See the discussion of the cachesize option in Section 5.2.3 on LDBM configuration.
The LDBM backend uses a number of disk-based index files. If the underlying hash or B-tree package supports in-memory caching of these files, performance can be greatly improved, especially on modifies. The size of this in-memory file cache is given by the dbcachesize option, discussed in more detail in section 5.2.3 on LDBM configuration. The default dbcachesize is 100K.
Finally, one of the best performance tune-ups you can do is to make sure you are maintaining the right indices. Too few indices can lead to poor search performance. Too many indices can lead to poor update performance. For example, the LDBM backend would be perfectly happy to maintain substring and approximate indices for the objectclass attribute, but this would not be useful and would just slow down update operations. If your database has many entries and is handling queries for substring equality on the surname attribute, you should make sure to maintain a surname substring index so these queries are answered quickly.
So, take a look at the index lines in your slapd configuration file to ensure that only those indices that make sense and are needed are being maintained.
For many sites, running one or more slapds that hold an entire subtree of data is sufficient. But sometimes it may be desirable to have one slapd refer to other slapds for a certain part of the tree. This can be accomplished by creating a referral entry in one slapd's database pointing to another slapd. For those familiar with X.500, a slapd referral entry is similar to an X.500 knowledge reference.
The referral entry acts as a mount point, glueing two slapd databases together. A referral entry has an objectclass of "referral" and is named by a ref attribute containing a URL pointing to the slapd holding the data below the mount point. This mechanism is very general and allows slapd databases that are not normally hierarchical to be grafted together.
An example should help illustrate things. Suppose your company is running a slapd and just purchased a new company, also running a slapd. You can easily connect the two databases by creating an entry like this in your slapd's database.
dn: ref="ldap://new.host/o=New Company,c=US", o=Your
company, c=US
objectclass: referral
Now any subtree search that has this entry in its scope will return a referral to the new company, in addition to any entries matched in your database. Referral-aware clients will continue the search at the new company's server.
A mechanism similar to this is used to support distributed indexing, described in Appendix C.
In certain configurations, a single slapd instance may be insufficient to handle the number of clients requiring directory service via LDAP. It may become necessary to run more than one slapd instance. At the University of Michigan, for instance, there are four slapd servers, one master and three slaves. A DNS lookup of the name ldap.itd.umich.edu returns the IP addresses of those four servers, distributing the load among them. This master/slave arrangement provides a simple and effective way to increase capacity, availability and reliability.
Slurpd provides the capability for a master slapd to propagate changes to slave slapd instances, implementing the master/slave replication scheme described above. Slurpd runs on the same host as the master slapd instance.
Slurpd provides replication services "in band". That is, it uses the LDAP protocol to update a slave database from the master. Perhaps the easiest way to illustrate this is with an example. In this example, we trace the propagation of an LDAP modify operation from its initiation by the LDAP client to its distribution to the slave slapd instance.
Sample replication scenario:
When slapd is configured to generate a replication logfile, it writes out a file in a format which is a variant of the LDIF format. The replication log gives the replication site(s), a timestamp, the DN of the entry being modified, and a series of lines which specify the changes to make. In the example below, "Barbara Jensen" has replaced a line of her multiLineDescription. The change is to be propagated to the slapd instance running on truelies.rs.itd.umich.edu. The lastModifiedBy and lastModified Time attributes are also propagated to the slave slapd.
 replica: truelies.rs.itd.umich.edu:389
 time: 809618633
 dn: cn=Barbara Jensen, ou=People, o=University of Michigan,c=US
 changetype: modify
 delete: multiLineDescription
 multiLineDescription: I enjoy sailing in my spare time
 -
 add: multiLineDescription
 multiLineDescription: A dreamer...
 -
 delete: lastModifiedBy
 -
 add: lastModifiedBy
 lastModifiedBy: cn=Barbara Jensen, ou=People, o=University of Michigan, c=US
 -
 delete: lastModifiedTime
 -
 add: lastModifiedTime
 lastModifiedTime: 950825073308Z
 -
The modifications to lastModifiedBy and lastModifiedTime were initiated by the master slapd.
Slurpd supports the following command-line options.
-d <level> | ?
This option sets the slurpd debug level to <level>. When level is a `?' character, the various debugging levels are printed and slapd exits, regardless of any other options you give it. Current debugging levels (a subset of slapd's debugging levels) are
            4 heavy trace debugging
           64 configuration file processing
        65535 enable all debugging
Debugging levels are additive. That is, if you want heavy trace debugging and want to watch the config file being processed, you would set level to the sum of those two levels (in this case, 68).
-f <filename>
This option specifies an alternate slapd configuration file. Slurpd does not have its own configuration file. Instead, all configuration information is read from the slapd configuration file.
-r <filename>
This option specifies an alternate slapd replication log file. Under normal circumstances, slurpd reads the name of the slapd replication log file from the slapd configuration file. However, you can override this with the -r flag, to cause slurpd to process a different replication log file. See section 10.5, Advanced slurpd Operation, for a discussion of how you might use this option.
-o
Operate in "one-shot" mode. Under normal circumstances, when slurpd finishes processing a replication log, it remains active and periodically checks to see if new entries have been added to the replication log. In one-shot mode, by comparison, slurpd processes a replication log and exits immediately. If the -o option is given, the replication log file must be explicitly specified with the -r option
-t <directory>
Specify an alternate directory for slurpd's temporary copies of replication logs. The default location is /usr/tmp.
-k <filename>
When slurpd uses kerberos to authenticate to slave slapd instances, it needs to have an appropriate srvtab file for the remote slapd. This option allows you to specify an alternate filename containing kerberos keys for the remote slapd. The default filename is /etc/srvtab. You can also specify the srvtab file to use in the slapd configuration file's replica option. See the documentation on the srvtab directive in section 5.2.2, General Backend Options. A more complete discussion of using kerberos with slapd and slurpd may be found in Appendix D.
To bring up a replica slapd instance, you must configure the master and slave slapd instances for replication, then shut down the master slapd so you can copy the database. Finally, you bring up the master slapd instance, the slave slapd instance, and the slurpd instance. These steps are detailed in the following sections. You can set up as many slave slapd instances as you wish.
Follow the procedures in Section 4, Building and Installing slapd. Be sure that the slapd instance is working properly before proceeding. Be sure to do the following in the master slapd configuration file.
Install the slapd software on the host which is to be the slave slapd server. The configuration of the slave server should be identical to that of the master, with the following exceptions:
In order to ensure that the slave starts with an exact copy of the master's data, you must shut down the master slapd. Do this by sending the master slapd process an interrupt signal with kill -TERM <pid>, where <pid> is the process-id of the master slapd process.
If you like, you may restart the master slapd in read-only mode while you are replicating the database. During this time, the master slapd will return an "unwilling to perform" error to clients that attempt to modify data.
Copy the master's database(s) to the slave. For an LDBM-based database, you must copy all index files as well as the "NEXTID" file. Index files will have a different suffix depending on the underlying database package used. The current possibilities are
You should copy all files with such a suffix that are located in the index directory specified in your slapd config file.
To configure slapd to generate a replication logfile, you add a " replica" configuration option to the master slapd's config file. For example, if we wish to propagate changes to the slapd instance running on host truelies.rs.itd.umich.edu:
 replica host=truelies.rs.itd.umich.edu:389
        binddn="cn=Replicator, o=U of M, c=US"
        bindmethod=simple credentials=secret
In this example, changes will be sent to port 389 (the standard LDAP port) on host truelies. The slurpd process will bind to the slave slapd as "cn=Replicator, o=U of M, c=US" using simple authentication with password "secret". Note that the entry given by the binddn= directive must exist in the slave slapd's database (or be the rootdn specified in the slapd config file) in order for the bind operation to succeed.
Restart the master slapd process. To check that it is generating replication logs, perform a modification of any entry in the database, and check that data has been written to the log file.
Start the slurpd process. Slurpd should immediately send the test modification you made to the slave slapd. Watch the slave slapd's logfile to be sure that the modification was sent.
slurpd -f <masterslapdconfigfile>
When slurpd propagates a change to a slave slapd and receives an error return code, it writes the reason for the error and the replication record to a reject file. The reject file is located in the same directory with the per-replica replication logfile, and has the same name, but with the string ".rej" appended. For example, for a replica running on host truelies.rs.itd.umich.edu, port 389, the reject file, if it exists, will be named
/usr/tmp/truelies.rs.itd.umich.edu:389.
A sample rejection log entry follows:
 ERROR: No such attribute
 replica: truelies.rs.itd.umich.edu:389
 time: 809618633
 dn: cn=Barbara Jensen, ou=People, o=University of Michigan, c=US
 changetype: modify
 delete: multiLineDescription
 multiLineDescription: I enjoy sailing in my spare time
 -
 add: multiLineDescription
 multiLineDescription: A dreamer...
 -
 delete: lastModifiedBy
 -
 add: lastModifiedBy
 lastModifiedBy: cn=Barbara Jensen, ou=People, o=University of Michigan, c=US
 -
 delete: lastModifiedTime
 -
 add: lastModifiedTime
 lastModifiedTime: 950825073308Z
 -
Note that this is precisely the same format as the original replication log entry, but with an ERROR line prepended to the entry.
It is possible to use slurpd to process a rejection log with its "one-shot mode." In normal operation, slurpd watches for more replication records to be appended to the replication log file. In one-shot mode, by contrast, slurpd processes a single log file and exits. Slurpd ignores ERROR lines at the beginning of replication log entries, so it's not necessary to edit them out before feeding it the rejection log.
To use one-shot mode, specify the name of the rejection log on the command line as the argument to the -r flag, and specify one-shot mode with the -o flag. For example, to process the rejection log file /usr/tmp/replog.truelies.rs.itd.umich.edu:389 and exit, use the command
slurpd -r /usr/tmp/truelies.rs.itd.umich.edu:389 -o
In mixed environments where both X.500 DSAs and slapd are used, it may be desirable to replicate changes from a slapd directory server to an X.500 DSA. This section discusses issues involved with this method of replication, and describes the currently-available facilities.
To propagate changes from a slapd directory server to an X.500 DSA, slurpd runs on the master slapd host, and sends changes to an ldapd which acts as a gateway to the X.500 DSA:
Figure 6: Replication from slapd to an X.500 DSA
Note that the X.500 DSA must be a read-only copy. Since the replication is one-way, updates from DAP clients connecting to the X.500 DSA simply cannot be handled.
A problem arises where attribute names differ between the slapd directory server and the X.500 DSA. At present, slapd and slurpd do not support selective replication of attributes, nor do they support translation of attribute names and values. For example, slurpd will attempt to update the "modifiersName" and "modifyTimeStamp" attributes on the slave it connects to. However, the X.500 DSA may expect these attributes to be named "lastModifiedBy" and "lastModifiedTime".
A solution to this attribute naming problem is to have the ldapd read oidtables that map "modifiersName" to the objectID (OID) for the "lastModifiedBy" attribute and "modifyTimeStamp" to the OID for the "lastModifiedTime" attribute. Since attribute names are carried as OIDs over DAP, this should perform the appropriate translation of attribute names.